Incremental Coaching – A Better Alternative to Formal Observation?

Chalkboard illustration of a man walking up stepsIt is common practice in many educational institutions for teachers to be observed just once a year.  This annual observation can be a stressful experience; often high stakes with the outcome directly linked to performance management.  As a result, teachers can feel under pressure to ‘perform’ and deliver a lesson which bears little resemblance to what happens in their day-to-day teaching; quite often they will pull out a lesson which has been well rehearsed.  The whole process is rather unnatural – writing lengthy and detailed lesson plans with carefully thought out aims, learning outcomes, anticipated problems and minute-by-minute details on procedure.  In contrast, many experienced teachers will usually just write a brief running order as a lesson plan for their regular, unobserved classes.

Incremental Coaching, as advocated by Paul Bambrick-Santoyo in his book Leverage Leadership, could provide an alternative, leading to a shift from summative assessment of teaching to a more formative approach.  The basic premise is that of a cycle of less formal, shorter and more frequent, non-judgemental learning walks.  Each learning walk is followed up by an action-based coaching conversation focussing on just one specific aspect of teaching, giving the teacher a week or so to put things into practice before their next learning walk.

Recent research, including that by Matthews (2017), has shown that adopting an incremental coaching model can lead to rapid progress and development in teaching practice.

My colleagues and I at Cambridge Regional College have recently undertaken some action research into incremental coaching – the findings of which I will be presenting at this year’s International House London Future of Training Conference on Saturday 9th November 2019 and the International House World AMT Conference on Saturday 12th January 2020.  Come along to learn more and hear about the impact it is having on teaching and learning in our context.

78539210_2511910762229380_4083147759593455616_o

Screenshot 2020-01-13 at 22.46.27

To see the slides from the presentation, click here.


References

  • Bambrick-Santoyo, P. (2012). Leverage Leadership: A Practical Guide to Building Exceptional Schools. Jossey Bass.
  • Matthews, P. (2017). The power of incremental coaching – improving teaching quality. Professional Development Today, 19.1, 40-50.
Posted in Manager's Office | Tagged , , , , , , , , , , , , | Leave a comment

Effective Eliciting

This is my fourth post in a series of posts going ‘Back to Basics‘, re-examining techniques and ideas introduced on teacher training courses.


What is eliciting?elicit

The British Council Teaching English website defines elicitation as ‘a technique by which the teacher gets the learners to give information rather than giving it to them’.

Why do we elicit?

Eliciting language from the students can help in creating a more learner-centred classroom, getting the students more involved and engaged in the lesson.  Rather than spoon-feeding the students, it makes them more active in the learning process.  Eliciting builds on the students’ existing knowledge, linking old and new information.

When do we need to elicit language?

Eliciting language can happen in many moments during a lesson, such as:

  • Vocabulary – in a receptive skills lesson (pre-teaching items before reading or listening to a text).
  • Language focus – eliciting features of meaning, form and pronunciation of the target language.
  • General knowledge – finding out what students know about a topic during a lead in.

This post focuses on eliciting vocabulary during a pre-teaching stage of a receptive skills lesson.

The value of pre-teaching is an issue which tends to polarise experienced teachers.  It often features quite predominantly on a CELTA course, but as teachers gain experience, many tend to find themselves pre-teaching less, and instead encouraging learners to deduce meaning from context.  For more on this debate, see this IH Journal article by Chris Ozog, and this blog post by Rachel Roberts.

But for now, let’s just remind ourselves what pre-teaching is and why one might decide to do it:


What is pre-teaching?

The British Council Teaching English website defines pre-teaching as ‘the teaching of the language learners need before an activity’.  It is commonly done in a reading or listening lesson before the learners are exposed to the text for the first time.  There may be important words in the text which are beyond the learners’ level, and could block understanding; focusing quickly on these words before being given the text can support the learners, providing scaffolding.  Otherwise, the teacher may find themselves having to teach the same word again and again to many different individuals as they come across it in a reading text; it can also help to reduce the need for students to stop and reach for a dictionary when they find a new word, speeding things up somewhat.

What to pre-teach?

Naturally, when teachers are deciding what to pre-teach, they often simply look for difficult words in the text.  A little more thought and judiciousness is required though to ensure this stage is valuable use of lesson time.  Items to pre-teach might include:

  • An item which the student needs to understand in order to complete the task which has been set (e.g. it is in the question, or is necessary to answer the question).
  • An item which is key to understanding the overall meaning of a text.
  • An item which assumes the reader has specific cultural knowledge.
  • An item which occurs frequently in the text.

Of course, it would be unadvisable to pre-teach all the ‘difficult’ words which appear in a text.  This language is being taught to provide some support in helping the learners process the text; they need to be able to tolerate and deal with ambiguity too.


Techniques for eliciting vocabulary

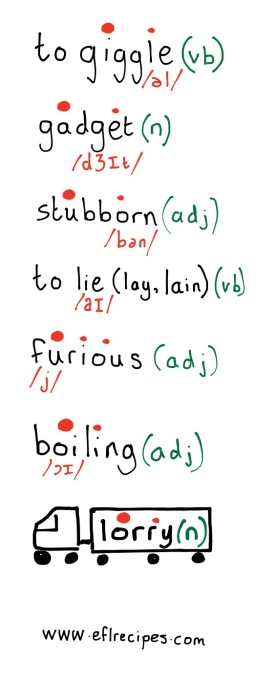
Definitions – “This is when a person laughs in a nervous or silly way; young children might do this.” – to giggle

Exemplification – “A mobile phone, a tablet, a GPS (Sat-Nav), an MP3 player, an e-reader.” – a gadget

Context/Anecdote (Useful for more abstract items) – “One of my friends has very strong views and he never changes his opinions, even when it is clear to everyone else that he is wrong; what can we call a person like this?” – stubborn

MimeTeacher lies on the floorto lie

Synonyms – “This means the same as very angry.” – furious

Antonyms – “What’s the opposite of freezing?” – boiling

Flashcards/visuals/drawings/realia Teacher shows a picture of a lorry, draws one on the board, or brings a toy lorry into class – lorry


How can we make eliciting effective?

Go from meaning to word (not word to meaning) – rather than asking “What does ‘crew‘ mean?”, ask “What do we call all the people who work on an aeroplane or a boat?”.  In the first example, the teacher is eliciting meaning, which helps few – what can often happen in this situation is that a student who already knows the word offers the answer, leaving those who didn’t know the word with little information about meaning; the teacher here is ‘flying with the fastest’. Going with the concept first, as in the second question above, keeps everyone at the same pace so meaning is clear before the new item is dropped into the gap.

Praise good contributions – maybe you are trying to elicit ‘huge’ and a student comes out with ‘enormous’. Rather than telling the student that they are wrong, give them credit and say something like “that’s a very similar word, does anyone know another one? … beginning with ‘h’?”

Don’t flog a dead horse – if it becomes clear that the students have understood the concept but just don’t know the word, then provide the item yourself and concept check to ensure they are clear on meaning.  Drop the language item in to fill the gap in their lexis.

Eliciting is not a game of charades – Avoid the temptation to say things like “It sounds like ‘wiggle'”, when eliciting ‘giggle’ – Meaning is key, form comes later.

Keep it snappy – remember this language is not the target language of the lesson, it is just being taught for recognition. A 15-minute pre-teaching stage in a 40-minute reading or listening lesson does not contribute much to meeting the main lesson aim and is not efficient use of valuable classroom time.  This stage can interrupt the flow of a lesson, and students might wonder how the seemingly random words being taught are connected, so to avoid this, be snappy with it and limit it to only the essential items (usually no more than 3 or 4, and no more than a minute or so for each).

Check meaning – after meaning has been conveyed, use concept checking techniques to ensure that the students have got it.  For help with concept checking, see my previous post (Concept Checking Revisited).


Stages of effective eliciting

Convey
Use a variety of techniques to provide a balance of focus and pace.

Check
Use concept checking techniques to ensure students have understood the meaning.

Model
Provide, or elicit from a student, a clear model of the pronunciation.

Drill
Allow students to practise saying the item, first together with others (choral drilling), then nominating students randomly so you can focus on individual learner problems (individual drilling).

Board
Provide a written model on the board for students to copy and have a written record in their notes. Eliciting and boarding the part of speech, word stress and any tricky sounds is useful here so the students can have a record of how to use and say the item.  See a previous post (Cheeky Phonemes) for more tips on highlighting tricky sounds on the board.


Concluding thoughts

In summary, my top tips for effective eliciting and pre-teaching would be:

  • Think carefully about why you are pre-teaching language – is it really necessary?
  • Remember the stages:  Convey -> Check -> Model -> Drill -> Board
  • Meaning is key
  • Be efficient and keep it snappy!
Posted in Mains | Tagged , , , , , , , , , , , , , | 3 Comments

Starting with Quotations

Quotation-Marks

Stuck for an idea for a lead-in?

Starting a new unit and don’t want to go straight into the book?

Not sure how to set the context in a communicative way?

This simple idea might be just the activity for you.


Getting learners discussing quotations on a topic can be an engaging, communicative and student-centred start to a lesson; it can come as a welcome alternative to discussing questions in pairs.  Quotations on most topics can be found pretty easily, though the more abstract topics perhaps lend themselves best to this activity.  Many course book units have an overarching theme, for example ‘success’, ‘challenge’, ‘love’, ‘laughter’, ‘music’, ‘travel’ etc.  Discussing quotations on the topic can introduce the theme in a thought-provoking way.


How to go about it:

  1. Search for quotations on the internet.  A simple google search for ‘success quotes’, for example, delivers over 129,000,000 results, so you shouldn’t have too much trouble finding some!
  2. Cut and paste any appropriate quotations into a document.
  3. Whittle down your list of quotations to about 10 or so.  This is not an easy task – include quotations which are most likely to stimulate discussion and not cause too many vocabulary issues, perhaps choose quotations from people your students might have heard of.
  4. Print or write out the quotations on small strips of paper and pin them up around the room – ideally do this before the lesson starts for a seamless start to the activity.
  5. Ask students to circulate with a partner discussing the meaning of the quotations.  Give them a task to focus them (e.g. choose their favourite quotation, or the quotation they agree/disagree with most).  Allow plenty of time for this.
  6. Once back in their seats, you could pair students up with a new partner to exchange ideas.
  7. Get some content feedback open class – e.g. which was the favourite of the class and why?
  8. Pick up on some language areas – e.g. common vocabulary issues, different interpretations of meaning.

Examples

Success quotations (found via a google search)success

“Success is walking from failure to failure with no loss of enthusiasm.” Winston Churchill

“I have not failed. I’ve just found 10,000 ways that won’t work.” Thomas Edison

“Opportunities don’t happen. You create them.” Chris Grosser

“It is not the strongest of the species that survive, nor the most intelligent, but the one most responsive to change.” Charles Darwin

“However difficult life may seem, there is always something you can do and succeed at.” Stephen Hawking

“I’ve failed over and over and over again in my life and that is why I succeed.”  Michael Jordan

“The most important single ingredient in the formula of success is knowing how to get along with people.” Theodore Roosevelt

“What’s money? A man is a success if he gets up in the morning and goes to bed at night and in between does what he wants to do.” Bob Dylan

“If you have no critics you’ll likely have no success.” Malcolm X


Timing

It can be difficult to judge how long this activity will last; you may need to ‘go with the flow’ somewhat.  Depending on the length of your lesson and what you intend to cover, you may want to use fewer quotations for a snappier lead in, particularly if you have some meaty lesson content coming up.  For more tips on timing, see this previous post.


Benefits:

  • The students start communicating right at the start of the class.
  • The quotations provide a stimulus for discussion, helping students who might struggle for ideas, or those who are less opinionated.
  • Discussion of more abstract ideas stimulates deeper engagement and thought, rather than simply talking about personal experiences.
  • The discussion that emerges is real-life and is engaging for the students.
  • This activity provides variety of focus and pace, and is student-centred.
  • Quotations tend to be memorable.

speech bubbles

So, why not give it a go?  Hopefully it’ll be a success.

For more ideas on lead-ins, click here.

Comments welcome below.

Posted in Starters | Tagged , , , , , , , , | 2 Comments

Cheeky Phonemes

Cheeky PhonemesMany teachers find the phonemic chart a little overwhelming, whether they be newly qualified teachers, trainees on a teacher training course such as the CELTA or Delta, or even very experienced teachers.

There can be no better place to start learning about phonemes and the phonemic chart than Adrian Underhill’s excellent book ‘Sound Foundations’, and his accompanying blog and YouTube video.  Other useful resources include the Macmillan Interactive Phonemic Chart and the Cambridge English Online Phonetics Focus website.


It can be daunting, trying to write entire transcriptions of words on the board.  However, it is often much more useful for the student (and easier for the teacher) to simply highlight the troublesome sounds, as you can see I have done in the title of this post.  I like to call this the ‘cheeky phoneme’.

Here are some examples of cheeky phonemes:

File 10-11-2017, 14 40 13

In all the above examples, I have tried to identify the sounds which students are likely to have difficulty with, particularly when spelling can have an influence on pronunciation.  ‘Haphazard’, is up there as a recent student of mine was convinced that the pronunciation was /ˈhæfəzəd/, making an overgeneralisation that the ‘ph’ spelling in English is always pronounced /f/.

You will have noticed that the phonemes are all highlighted in red; it can be useful for teachers to use a consistent colour code in their boardwork.  For more boardwork tips, see an earlier post ‘Tweaking your Boardwork‘.


Practice

If you would like some practice with writing cheeky phonemes, get yourself a pen and paper have a go with the words below:  Remember to highlight only those sounds which are likely to cause difficulty for your students.

  1. nausea
  2. mountain
  3. pint
  4. enough
  5. because
  6. prawn

Click here to see examples of possible sounds to highlight.  You may have identified different sounds; this of course can be dependent on your teaching context and it is important to identify the sounds that the learners in your context have difficulty with.


Using phonemic script takes practice, and planning, but working with a few key sounds and getting a few cheeky phonemes up on the board can be a good starting point.

For more on pronunciation, see an earlier post, ‘M/F/P – Meaning, Form and ?

Feedback and comments welcome below, as always.

Posted in Sides | Tagged , , , , , , , , , , , | 4 Comments

My one-to-one student just wants to chat

So, after planning a lesson tailored to the needs of the individual student, all they seem to want to do is have a chat. You start to wonder if it is worth planning the lesson at all.   Then there’s an occasional pang of guilt when you think about how much the student is paying just for ‘a chat’.

This is, I’m sure, a familiar situation for many an EFL teacher. A one-to-one lesson naturally lends itself to a less structured approach. The teaching situation, in fact conforms very much to the three tenets of Dogme teaching (Lessons are Conversation Driven, Materials Light, and focus on Emerging Language). But what about that nagging thought? What would the student say they learned in that lesson? Are they making progress? Are they aware of the progress they are making?

One thing that can really make a difference is ensuring that there is a good amount of feedback and error correction. One approach is for the teacher to take notes throughout the lesson on new language and areas of difficulty. A template such as the one below could be used to keep a record of any student mistakes in language and pronunciation, and any new emerging language: 1:1 feedback


Dealing with feedback

The teacher could devote the final 10 minutes or so of the lesson to language feedback/upgrading.   This time can be used for the following:

  • The student can be encouraged to self-correct their slips and the teacher can work with the student to upgrade their language.
  • The emerging language can be revisited and recycled, perhaps with the teacher ‘testing’ the student.  E.g. ‘What was the word for that small, round, green vegetable you don’t like?’
  • The teacher can elicit the correct pronunciation of any words, utterances, highlighting difficult sounds or stress patterns; this can be followed by some targeted drilling to improve the student’s pronunciation.
  • As in the picture above, a different coloured pen can be useful for this stage.

Of course, at the end of the lesson, the student can take the language review home to look at in more depth if they want to. It can be useful for the teacher to take a photocopy too in order to inform future planning and encourage further recycling of language.


 Advantages of this approach:

  • This encourges a high level of overt feedback on production.
  • The students have a record of emerging vocabulary.
  • The students are encouraged to self-correct their slips and errors.
  • The student becomes aware of their most common mistakes and fossilised errors.
  • Progress is easier to track and importantly, it is made overt to the student.
  • The other side of the form can be used as a mini whiteboard for any language presentations/clarifications.
  • The student leaves the lesson with a record of what they covered in the lesson and opportunities to review it in their own time.

I personally use this form with all my one-to-one classes and find that students really appreciate it. Some of my long-term students have kept all of their feedback forms in a folder and would refer back to them during following lessons, trying to remember words from previous classes and remembering their previous mistakes. If you’ve never used this approach, then give it a go.  Here is a blank template which you are more than welcome to use: One-to-one Error Correction

Feedback and suggestions are very welcome in the comments below:

image

Posted in Uncategorized | Tagged , , , , , , , , , , , | 30 Comments

Developing Reading Skills – A guest post by Suzanne Goodwin

I am delighted that Suzanne agreed to write this guest post based on a super INSETT session she recently delivered at IH Palermo.

Without further ado, I’ll hand over to Suzanne.


Books

There has been considerable discussion in contemporary ELT about the prevalence of ritualistic teaching, and reading is a case in point. Texts tend to be used in the same ways: either to present language, or as part of a skills lesson that follows a fixed CELTA- framework of lead in, pre-teaching vocabulary, gist and detailed questions. In the first case, we are interested in comprehension because it allows the meaning of the target language to be understood from the context. And while the second case certainly comes from useful principles, by applying it uniformly we may be ignoring an important opportunity to develop much needed reading skills.

Most students have specific reading needs in the language they are learning. They may encounter reports at work, university textbooks, emails, timetables, magazine or news articles, to name a few, and all of these genres benefit from particular reading sub-skills which may or may not be naturally transferred from L1. Ideally, teachers should find out what these requirements are through needs analyses or informal discussion and plan the lesson content and methodology accordingly. However, even when this is not possible, more can be done to ensure that the texts that we use are fully exploited and students develop a text-attack toolkit which they can use outside the classroom.


Try the following activities:

1.   Read the text below quickly (ignore any new words at the moment).

How many examples of genre can you find in 10 seconds?

We are constantly bombarded by written information which we process at some level, from a vroomy glance at the adverts as we walk down the street to a quoogh examination of the reports we receive at work. Each time you check a train timetable, sbokily look at a menu or gawd through the newspaper your brain is making decisions about how to read it based on the text type and why you are reading it. For example, when we finally have time to pick up that novel we’ve been wanting to read since Christmas, we’ll read it carefully so as to follow the developments of the plot. But if I need to find out how to change the date on my DVD player I won’t read the manual from cover to cover, I’ll use the index to find the best page.

2.  Identify any vocabulary you don’t know (this has been invented for you!)

Can you find any clues in the surrounding text to suggest what it might mean?

For example: vroomy is an adjective. It refers to glance, which I know is about looking. In this case, I’m looking at adverts in the street. How do I do that? Quickly? Without concentration?

3.  Underline the three things that we consider when we read.

What implication does this have for classroom practice?


Rationale:

Speed ReadingThe first activity focuses on scanning, or reading a text in order to find specific information. This can be a fun activity to use with texts that are rich in names or numbers, and it accurately reflects how we process certain genres, like timetables or information sheets. If you have an interactive whiteboard, you could display the text, line students up in 2 teams, and have them race to hit or circle the name or number that you call out. Technology also provides engaging ways to practice skimming (reading quickly in order to understand the main idea of a text). For example, you can bring the screen cover down over the projected text so students have to read quickly, or use a PowerPoint animation to make the text appear and disappear at an appropriate speed.

The second task is designed to help students work out meaning from context. Learners benefit from being shown how to do this with an example on the board, with the teacher highlighting important references and eliciting potential interpretations. It can be helpful to use a word which is clearly nonsense or even just a blank space, as students are more likely to be curious and less likely to focus on the fact that they don’t understand. Importantly, they should be reassured that it isn’t necessary to guess exactly the right word. Rather, they should try to grasp the concept and all feasible suggestions should be welcomed. Unlike pre-teaching, this approach can be easily applied to texts that students meet outside the classroom.

Hopefully you came up with ideas similar to subconscious, thorough, cursorily, and flick!

In the final stage, you were asked to look at the paragraph as a whole and, importantly, to consider its implications. When we read, we consider what it is, why we’re reading it, and how we should read it. When we plan reading lessons, we should put ourselves in the students’ shoes and ask these questions in order to devise effective activities that develop appropriate reading skills. This means that the framework of a traditional receptive skills lesson probably won’t be appropriate for all texts, and the teacher needs to tailor the lesson shape accordingly. However, it should involve time for students to reflect and relate what they’ve read to their world, their opinions, and their original reason for reading. It’s the equivalent of you reading this blog post and then deciding whether or not it will affect your teaching practice.

Some people may argue that this idea promotes an overly atomistic view of reading and that, with practice, students will naturally transfer and develop effective reading skills. However, in many contexts learners have limited exposure to the L2 and benefit from being made aware of the tools that they can use to process written information. As teachers, our job is to provide these tools and explain how to use them. Students can then decide whether and when to use them outside the classroom.

Reading

Many of these ideas are adapted from Teaching Reading Skills in a Foreign Language, by Christine Nuttall (Heinemann: 1982), which I thoroughly recommend to anyone interested in the subject.

Posted in Mains | Tagged , , , , , , , , , , , | Leave a comment

Top Tips for Teaching Teenagers

teenagersTeenagers… The very word can fill a teacher with dread…

Teens get a bad rap.  Ask anyone to come up with an adjective to describe a teenager and they are likely to come up something fairly negative like ‘moody’, ‘uncooperative’, ‘loud’ etc.  There are also plenty of positive adjectives to describe teenagers: ‘curious’, ‘passionate’, ‘independent’, ‘creative’ to name but a few.

There’s a lot going on in a teenager’s head as their brains are developing towards maturity. The frontal cortex, in particular, develops rapidly during adolescence. This is responsible for executive functions and cognitive flexibility including the ability to direct our attention, to plan future tasks, to inhibit inappropriate behaviour, and to keep more than one thing in mind at once (Blakemore & Frith, 2005).

Whilst these changes can cause some of the undesirable characteristics already mentioned, there are some positives. An adolescent’s brain is adaptable, it can be ‘sculpted and shaped’ as neural connections are ‘eliminated and pruned’ (Geidd, 2002).  It is, in fact, an optimal time for learning.  For more of the research on teenage brains, follow this link.

Clearly this has huge implications for teachers of adolescents regarding their approach.  Teachers need to think carefully about suitable activities and resources; learners’ interests; classroom management; language presentation; and of course motivation.


Here are some top tips from experienced EFL teachers currently teaching teenagers.


Corinne

Corinne’s top tip focusses on actively finding out about the students’ interests.  

Some ways to do that:

  • Use class discussion activities, mingles and surveys about how they spend their free time.
  • Ask the students to do some written work about their interests.
  • Create an online survey using a free resource such as SurveyMonkey.

You can then use the results of all of this to inform your planning. 

  • Can you find any interesting resources, articles or videos related to their interests for use in skills work?
  • What topics might stimulate actual discussion or debate?
  • Most teenagers these days are interested in technology, embrace this and exploit it.  A very simple but effective activity is to get them describing photos taken on their smartphones. This can stimulate a huge amount of speaking and can also be useful exam practice.

Remember, your students are the best resource you have in the classroom. Use them!


Suzanne

Suzanne spoke about resources to use with teenagers.

  • Use current, up-to-date material, and where possible, authentic material to increase motivation and personalisation.  Let them bring their world into the classroom.
  • Show an interest in teen culture but don’t try to play teenager and be one of them!  The teacher represents authority and this distinction needs to be kept clear.
  • Exploit natural communication as it emerges in class and respond to this. A Dogme approach can work well with teenagers.

Some sources of material

  • Lessonstream has some excellent ready to go lessons, many based on short YouTube videos. There is some really great stuff on there. Check it out.
  • Similarly, Film English has hundreds of really great lessons based around videos, and many on teen-friendly topics.
  • LyricsTraining is a great one to recommend your students try out at home. It really gets them engaged with listening to their favourite music and working on the lyrics. A good one to encourage learning out of class.

  • Lizzie

Lizzie discusses the importance of challenge.

Challenge provides engagement, and under-challenging the learners therefore can can create disengagement. Quite often this lack of challenge is one of the causes of poor discipline in the adolescent classroom.

Providing challenge and maximising the the learning potential of the students is one of the key areas of Demand High Teaching. Have a look at Jim Scrivener and Adrian Underhill’s Demand High blog for more on this, and my earlier blogpost on one simple demand high technique.


Anthony

Anthony advises us to use songs with teenagers

With some of my past groups of teenagers, songs were quite simply the one thing that engaged the students the most. Music can be a window into the soul and it would be foolish not to exploit this in class.

Some ideas for songs

  • Find a song which tells a story or sends an important message and use it as you would use any other text in a listening lesson.  There are a couple of examples in the ‘Something Authentic‘ corner on this blog.
  • Some songs can be used as a contextual vehicle for language work.
  • There is of course, the clichéd gapfill – an easy thing to do, but difficult to get right, choose the gaps wisely.
    An alternative to the gapfill is writing the lyrics wrongly, with students correcting the text.
  • You could cut the lyrics up into lines or verses, with students listening and putting them into the correct order.
  • Find forums discussing the meanings of song lyrics for students to read and discuss, and write their own comments (warning – many of these forums contain inappropriate language so cutting and pasting from these is often better than going directly to the websites).

Jenny

Jenny suggests role-play as an activity for teenagers

Teens want to express themselves but often fear embarrassment. Role-play allows teens to express their inner, conflicting feelings in a safe manner.  Teens may be more comfortable expressing opinions of other people rather than their own opinions.

Using topical or slightly controversial (but not personal) issues can stimulate lots of speaking in a role-play. Some of my students recently performed very successful role-plays on animal rights, for example.

For more tips from Jenny on teaching young learners, see her guest post on ‘Routines with Young Learners‘.


Rupert

Rupert highlights the importance of rapport.

In my experience teaching and observing teen classes, the number one thing that makes a difference is rapport. If the teacher has established a good rapport with the class, there is mutual respect, cooperation and negotiation.

Many factors contribute to creating rapport:

  • Take time to get to know the students – use getting to know you activities and make a conscious effort to learn and use their names all the time; take an interest in their lives.
  • Get down to to the level of the students and remove any physical objects between you and the class. Think about the arrangement of the furniture, the class dynamics in one recent class I taught changed dramatically the day I moved the desks into a horseshoe shape.
  • Respect them and treat them as individuals, foster a sense of personal identity.
  • Empower them and get them involved in class decisions.
  • Vary groupings – Lewis (2007) highlights “while friends are still very important, group identity loses some of its imprtance, and is replaced by individual relationships”
  • Let loose a little and have some fun with them.  Let your personality shine through.

Richard

Richard talks about using competive games

Many teens are highly competitive in the sense that they want to show off. Exploit this and give activities a game-like challenge.

  • Get students working in teams and winning points. This can be an effective way to promote positive behaviour in a class. The team with the most points at the end of the lesson could get some type of treat – perhaps deciding on a game to play or a song to listen to.
  • A variation on this is to give students a loyalty card in which they collect points for language production, participation, task completion etc. When they reach ten points they can receive a treat.
  • Games can provide a change of focus and pace, particularly if they involve physical activity.  However, they should be short and snappy and have some linguistic aim.
  • My favourite competitive game to use with teenagers is Kaboom!

I didn’t feel that it was fair to point cameras in the faces of the teachers without volunteering to do the same myself, apologies for the unfortunate camera angle!

Jonny

I spoke about creating a classroom contract to help with discipline

  • Consider drawing up a classroom contract early on in a new course.image
  • Elicit rules and consequences from the students. They can also draw up rules for the teacher.
  • This can all be negotiated together, and signed by the students.  This builds up mutual respect and makes the students responsible for their actions.
  • This should then be placed on the wall so it is available for reference for the entire course, and simply pointing to it can remind students.
  • See my example from a class of teens I taught in Argentina.  —>
  • When dealing with discipline, being consistent and treating everyone equally is the key.

Concluding thoughts

The adolescent classroom requires a specific teaching approach due to the
multifaceted and changing nature and needs of the learners; an approach
in which a heightened awareness of classroom dynamics, rapport building
and creating motivation are of high importance.

It is the quality of teacher-student relationships that makes the biggest difference in teaching this age group, and motivation is key. As Allen (2006) states, it is “as important for teenagers’ school success as the ways teachers deliver the subject matter”.

With thanks to the teachers of International House Language Centre Palermo for their invaluable contributions.


Bibliography

    • Allen, J . (2006). Cited by Bromley (2006).
    • Blakemore, S. & Frith, U. (2005). The Learning Brain. Oxford: Blackwell Publishing Ltd.
    • Bromley, A. (2006). What teenagers want. Inside UVA Online Volume 36, Issue 12.
    • Giedd, J . (2002). Interviewed on Inside the Teenage Brain (Spinks, S. 2002).
    • Lewis, G. (2007). Teenagers. Oxford: Oxford Univer sity Press.
    • Spinks, S. (2002). Inside the Teenage Brain. Front line TV programme.  Boston: Spin Free Production.
Posted in Kids menu, Mains | Tagged , , , , , , , , , , , , , , , | 3 Comments

Mulled Wine – A Christmas Treat

Mulled WineI’ve had lots of requests for the mulled wine recipe I used at our Christmas drinks party last night, so here goes. It’s based on a Jamie Oliver recipe which can be found here.  It takes a bit more effort than the pre-prepared stuff you can get in tea bags, but it is definitely worth it.


Ingredients

Spices

  • 200g sugar
  • 2 clementines
  • 1 lemon
  • 1 cinnamon stick
  • 1 vanilla pod (halved)
  • A couple of fresh bay leaves
  • A few gratings of whole nutmeg
  • 6 or 7 whole cloves
  • 2 star anises
  • A couple of bottles of red wine (I used a Sicilian Nero D’Avola, but any red wine will do fine I’m sure)

Method

  1. Put the sugar into a large saucepan and place on a medium heat.
  2. Using a vegetable peeler, peel the clementines and the lemon, trying to get just the outer layer and avoiding the white pith (much like when peeling the lemons in my recipe for limoncello).
  3. Add the peel to the pan.
  4. Squeeze the clementines and add the juice to the pan.
  5. Add the cinnamon stick, bay leaves, vanilla pod, nutmeg and cloves.
  6. Pour in a little wine, just enough to cover the sugar.
  7. Stir it all together and let the sugar dissolve.
  8. Bring the mixture to the boil for about 5 minutes. It should create a thick syrup, and will smell amazing. This stage is important as the high heat allows all the flavours to infuse.  If you add the wine before, then the alcohol will burn off with the heat.
  9. Turn the heat down, add the star anise and add the rest of the wine.
  10. Heat the mixture gently for 5 minutes or so.
  11. Ladle into glasses and enjoy.

Have a great Christmas everyone!

Posted in Recipes | Tagged , | 2 Comments

How to write a TEFL CV

image

Part of my job involves teacher recruitment and therefore I’ve seen a good number of CVs over the years. Very few of the CVs have stood out, and many have been, quite frankly, terrible!


Some facts about CVs

Recruitment websites tell us that an employer on average spends anywhere between 5 seconds and 30 seconds to scan your CV, so you need to make an impact, fast.

Research cited by the Huffington Post here highlights that employers spend 80% of their brief review examining the following 6 key elements of a CV:

  1. Your name
  2. The current company you work for
  3. Your previous employment
  4. The start and end dates of your current position
  5. The start and end dates of your previous position
  6. Your educational background

A TEFL CV

A TEFL CV is not so different from a regular CV: it should include all the usual features you would expect. Ensure it is relevant to TEFL however.

Personal details

  • Naturally, a CV will need to include your contact details.
    Use a sensible, professional email address, an address like cheekygirl1984@lala.com doesn’t give a great impression!
  • You might also want to include date of birth and nationality here; though this is not technically required in a job application, employers often want to know this.

Experience

  • Put all relevant teaching experience first. This is what the employer is looking for.
  • Write it in reverse chronological order, ensuring there are no unexplained gaps.
  • When writing about experience, use positive action words like ‘developed’, ‘planned’, ‘organised’, ‘achieved’, ‘responsible’.
  • In experience state the type of schools you have worked with, levels and ages you have taught, include any experience you have with ESP.  Include dates.
  • Demonstrate your development and career progression. Your CV should shout ‘career teacher’, not ‘backpacker’.
  • Briefly mention non-EFL related experience, particularly if it includes transferable skills.  Employers are often curious to know about your pre-TEFL career.

Qualifications

  • Be specific here, employers often want to know where you trained, when and what grade you achieved.
  • Do not lie, it’s quite easy to check this these days, and employers will want to see certificates.

Skills

  • Include key transferable non-TEFL skills here, particularly if you have little teaching experience. These could include communication, computer skills, public speaking, foreign languages, administrative skills, working with children, coaching etc.
  • If applying for work abroad, mention any experience of living abroad or travelling.
  • Do you have any other useful skills, like a first aid qualification or driving license?

Interests

  • There is some debate about whether to include this on a CV. I would suggest including things that show your initiative, responsibility, teamwork and other key transferable skills.
  • Avoid passive solitary hobbies – an employer wants to know you have good people skills and will get on with students and colleagues.
  • Relate interests to the job, what do you have particular interests in? Have you attended any ELT conferences for instance?

References

  • Include two key references, ideally current and previous managers or teacher trainers.
  • I would say include names, rather than using an ‘available on request’ type of phrase, unless you really don’t want your current employers to know about your application.
  • Bear in mind however, your recent employers are the people potential employers will want to speak to most and the world of ELT is rather small.

image


General tips for writing a TEFL CV

Language

  • Write it in English if you are applying for a job with a private language school abroad.
  • If you are applying for work in state schools, then you may need to translate it into the local language.
  • Write it in good English, there really is no excuse for spelling and grammar mistakes in applying for a job as an English teacher.
  • Go through it with a fine tooth comb, get friends and colleagues to proofread it; mistakes are sometimes easier to spot if you read it from the bottom up.

Layout and presentation

  • Keep it to one or two pages – clear & concise, short & sweet.
  • Avoid ready made templates. Your CV should have a personal touch.
  • The upper middle first page is where the eyes naturally fall, so include key information here.
  • Ensure information is logically ordered and easy to read.
  • If printing the CV, use good quality white paper. (I was once given a CV with tea stains on it!)
  • If submitting an electronic version, consider sending a PDF to ensure formatting is not compromised and compatibility is not an issue.
  • Give the file a sensible file name, one which is easy to find.

Do your research

  • Tailor your CV to the job you are applying for.  Write your CV specifically for that role.
  • Include a covering letter and do the same here, it’s very easy to spot a generic letter sent out to loads of institutions, and an employer will probably stop reading when they notice this.

Other considerations

  • Think about your online presence, employers may Google you.  Tidy up any social networking profiles or up your privacy settings.
  • Consider creating a LinkedIn profile to support your CV.
  • You could include hyperlinks in your CV to any work you have done online.
  • If the job advert asks for ‘native speakers only’, write back explaining why such adverts are discriminatory – visit TEFL Equity Advocates to learn more about your rights and see a sample email.

Remember, a CV is your first contact with a potential employer and acts as an appetiser for an interview so it needs to have immediate impact.  Time invested in putting it together can really pay off.

Any other tips for writing a TEFL CV?  Comments welcome below.

Posted in Manager's Office | Tagged , , , , , , , , , , | 7 Comments

Warmer of the Week – Polarisation

Here’s an idea for a simple, low preparation, communicative activity to set the context and lead in to your lesson.

image

The basic procedure

  1. Write ‘I agree’ on one side of the board and ‘I disagree’ on the other side of the board.
  2. Write a statement on the board related to the context of the lesson.  Something a little controversial works well.
  3. Ask students to think about the statement and decide if they agree or disagree. Give them a minute or two to think about their reasons.
  4. Ask students to stand up and move to one side of the classroom, according to their opinion.
  5. Now you can either ask students to discuss the statement with someone who has the same opinion, or pair them up with someone from the other side of the room with a different point of view.

Lessons types this activity works well with:

  • A lead in to a reading or listening lesson dealing with a controversial topic.
  • A lead in to a writing lesson looking at a for and against discursive essay as a way to brainstorm and generate ideas.
  • A speaking lesson focussing on spoken discourse – providing practice of discourse markers used to express opinions (e.g. ‘as far as I’m concerned’, ‘if you ask me’, ‘that’s not the point’, ‘I see what you mean but’…etc.)
  • A warmer at the beginning of the lesson to get students out of their seats and working with different members of the group.

Some things to bear in mind:

  • Be ready with a back up plan if all the students share the same opinion and all gather in one half of the classroom. You could ask half  of the class to come over to the other side and try to think of reasons to support the opposing view.
  • This generally works better with a smaller class where furniture allows students to move around freely.

With thanks to James Blackburn for first telling me about this idea.

Posted in Aperitifs, Starters | Tagged , , , , , , | Leave a comment

Thank you for 100,000 hits!

imageSo after starting this blog as a New Year’s resolution back in early January, today sees me welcoming my 100,000th view.  I must say I’ve been rather overwhelmed by how far reaching the blog has been:

image

180 countries and counting… I don’t think I could name 180 countries if you asked me!

So thank you to all the readers, commenters, sharers and rebloggers.  Big thanks also to the British Council Teaching English Facebook page, which has sent many visitors my way.

With a six-figure view count, I’ve decided to register a new domain for the blog, so the blog can now be found at the easier to remember and type www.eflrecipes.com in addition to the original www.eflrecipes.wordpress.com.

Grazie a tutti, happy teaching (and cooking!)

Jonny
image

Posted in Uncategorized | Leave a comment

Routines with Young Learners – A guest post by Jenny Holden

Today I have the great pleasure of publishing a guest post written by the Young Learner Coordinator at my school. I’ve been trying to persuade Jenny to share her YL expertise here for some time and she finally surrendered. Some great reading for anyone who teaches young learners, especially for those of you starting new classes. One to bookmark!

Over to you Jenny…


IMG_1748It’s that time of year again as the new term kicks off and we meet our new students for the year. Meeting our new YLs can be a daunting prospect and it can often feel like we’re herding cats rather than teaching English for the first few months. Routines, or established patterns of behaviour, could be the solution…

Why Routines?

Carol Read (the Queen of teaching YLs) sheds light on this in her excellent book ‘500 Activities for the Primary Classroom‘. Her main points are summarised below:

IMG_1750Routines promote a positive learning environment as they help learners (who may have just been thrust into an alien environment with a new teacher who speaks a strange language) to feel secure and confident in the classroom. They help create a sense of community in the classroom too; encouraging co-operation, and shared purposes.

One of the most rewarding aspects of using routines is the opportunities which arise for natural language acquisition. When your students start parroting your instructions back to you or they’ve learnt a chunk of classroom language, not only does it reflect how we learn L1 but it provides the building blocks for noticing patterns in language for learning in later life.

But the greatest benefit of routines is that once your YLs are on board, they become more autonomous and your life as a teacher becomes much easier; it’s less stressful, less draining and it allows the focus to return to learning not just classroom management.
Not just a positive learning environment, but a positive teaching one too!


My top routines for primary students.

Before Class
Routines start outside the classroom; students should know where and how to wait for class. Encourage learners to line up outside and enter one by one as you welcome them in. It can be motivating to set up a ‘password’ system which is decided upon at the end of the previous lesson (A throwback from the much-loved I-Spy series).

Start of Class:
As YL teachers we’re not just teaching English but we play a part in developing the whole child too; help them develop their organisational skills; coats come off and are hung up as soon as they enter the classroom; students sit down and get everything out of their bags that they’ll need later on.

MaterialsIMG_1751

Encourage students to create a ‘book cake’ of their belongings under their chair for easy access (this will cut down on faff time later).


IMG_1757
Date and weather 

Elicit and board the date and weather from the students; it’s then ready to be copied into their note books later on in the lesson. Or hand this over to the learners; students at this age love helping the teacher; take advantage of this!

Taking the register

  • The register provides a great opportunity to recycle and review previously studied language (and let those latecomers trickle in).
  • You could ask each child a question about last lesson to help them ‘switch on their English brains’.
  • Or, as above, why not ask a student to take the register for you; it’s a great way to review those pesky question forms!

A wake up shake up!

IMG_1752.JPG

Movement at the start of the class is a great for you to take control of energy levels; wake up tired minds or wear off excess energy: Try this in a circle with your class (I’m sure you can imagine the moves!):

Hands up! Shake shake, shakety shake!
Hands down! Shake shake, shakety shake!
To the left, to the left, to the left, left, left!
To the right, to the right, to the right, right right!
Jump in, jump out and turn around!
Jump in, jump out and sit down!

(With thanks to Jack Williams for this)

Giving out materials/tidying up
Never do anything yourself that a student can do for you… just make sure you stage and model your instructions carefully!

Signals

  • Student signals

IMG_1756Surely one of the most common sounds from the YL clsssroom is ‘finished, finished, finished’. Having signals in place creates a much calmer atmosphere. Encourage students to put their hands on their heads / fingers on noses when they finish an activity. When playing or working in teams extend this to the whole group.

  • Teacher signals

If you want students to know that an activity is coming to the end, give time warnings followed by a countdown.  If you’re still struggling to get their attention try saying ‘1,2,3, Look at me!’ And wait. Be a lighthouse if necessary (sit in the middle of the classroom and look around the room until you have everybody’s attention. It just takes one student to understand and they’ll help the others catch on.

Closing routines

  • Allow ample time to set up homework, remembering to model activities so students understand what to do.
  • Encourage ss to record their homework (e.g on a homework record sheet).
  • Ss can then put their belongings away.
  • Use early finishers to help you tidy up the classroom; cleaning the board holds untold pleasure for students!

How to implement routines successfully

Routines do take time to establish, so have patience.

  • Start when planning, how will everyone know what is expected of them and what they should do?
  • Never explain when you can demonstrate; allowing time to introduce routines at the start of the term will pay off in the long run.
  • Use TPR or ‘Simon Says’ as a fun way to get your students trained. E.g. Simon says stand in a line, Simon says stand in a circle, put your hands on your head etc. This will soon become second nature to the learners.
  • Reward your students for doing as you want them to; smile at them, praise them, give them a sticker/smiley face/star. Show them that their behaviour pleases you and they’ll be keen to do so again.

I am sure many of you have your own routines; it would be great to hear about them.


Routines

Posted in Kids menu | Tagged , , , , , , , , | 10 Comments

A Story out of Context

Today I cleared out a cupboard full of old teaching material (I know how to have fun!)  I had accumulated files full of worksheets and little cut up cards I had made or photocopied years ago and inexplicably saved. I threw the vast majority out but found a couple of gems I haven’t seen for what must be 5 years or so.

One such gem was this storyboard:

IMG_1690 I’m afraid I have no recollection of the source, so if anyone recognises it, please help me reference it appropriately. It must be pretty old as the invitation in picture 2 says 1969!

At first I couldn’t remember what on earth I had used it for in class, in fact it got me thinking about other things you could use this story for.

Stories have great potential in the language classroom; the value of storytelling is neatly summed up by Andrew Wright here.  In this post however, I want to look at using stories as a way of presenting new language, rather than the art of storytelling itself.


A Contextual Vehicle

I’m a fan of using short stories and anecdotes as contextual vehicles for presenting language. There are so many language points you can draw out from a story to focus on and present grammar or vocabulary.  With a storyboard, the pictures provide a very visual representation of meaning to work on with the students.  Below are 3 possible language points for the storyboard above.


Narrative Tenses
Most stories have a number of different time references so an obvious language point to highlight when using a story is narrative tenses.  A teacher could elicit or highlight these tenses from the context of the story.  For example:

IMG_1690-0

Pic 1 – Tony was relaxing at home when he suddenly remembered he had been invited to a party.
Past continuous (background events), past simple and past perfect (passive) all in one picture.

imagePic 3 – He ran upstairs, put on his suit and ran downstairs.
Past simple (events in chronological order).

IMG_1692

Pic 4 – He tried to start his car but it had run out of petrol.
Past simple and past perfect.

IMG_1693 Pic 6 – When he got to the phone box, a woman was chatting and it was raining.
Past simple and past continuous (actions in progress).

IMG_1694 Pic 7 – He realised he hadn’t taken any money with him.
Past simple and past perfect.

IMG_1695 Pic 12 – When he finally arrived, his friends were leaving and the party had finished.
Past simple, past continuous and past perfect.

You could probably squeeze in some past perfect continuous too (He‘d been looking forward to going to the party for ages).


Phrasal verbs
I originally used the story as a presentation for phrasal verbs, at an intermediate level if I remember rightly.  The story could contain a number of phrasal verbs; of course the choice and complexity of the story is dependent on level.

Phrasal verbs that could be drawn out of this story:

Pic 1 – sit down, chill out, put (feet) up, stay in, not go out
Pic 2 – look forward to (going to the party)
Pic 3 – put on (his suit), go out
Pic 4 – get in (the car), run out of (petrol)
Pic 5 – come up with (an idea)
Pic 6 – queue up
Pic 7 – run out of (money/coins)
Pic 8 – get on (his bicycle)
Pic 9 – (He shouted) ‘Look out!’
Pic 10 – crash into (a policeman), fall off (his bike)
Pic 11 – get in (a taxi)
Pic 12 – turn up (to the party)


Expressions with get
Similarly, the lesson could focus on uses of get. There are many possible examples to draw out of the story:

Pic 1 – get home from work
Pic 3 – get changed
Pic 4 – get in (his car), get angry
Pic 6 – get to the phonebox, get angry
Pic 7 – get worse
Pic 8 – get on (his bike)
Pic 10 – get into trouble
Pic 11 – get a taxi
Pic 12 – get to the party


A possible procedure for this type of lesson:

Here’s what I would generally do with this kind of presentation.

1.  T leads into topic (in this case, being late).  T could ask learners to think about the last time they were late for something; they could brainstorm the worst things to be late for, or they could have some discussion questions about punctuality.

2.  T tells class he/she is going to tell them a story about a time when the T/friend of T was late (more fun if it is personalised).

3. T gives ss picture cut up (remembering to cut off or tippex out the little numbers in the corners!), and asks learners to put the pictures into a logical order.

4. T tells story and learners listen and check their order.

5. T elicits story from the learners picture by picture, eliciting or feeding in the target language, concept checking and drilling as necessary.  (A large version of the storyboard on the whiteboard or IWB helps here to get everyone focussed.

6. As story builds up T keeps returning to the beginning of the story and re-eliciting it, paying particular attention to the target language, perhaps asking students to tell the story in a chain, with each student talking about one picture each. T insists on accuracy at this stage.

7. Once T is confident learners have the story, T hands over to students to practise telling the story in pairs.  T monitors and helps where necessary.

8. As an extra challenge, T could then remove the story and students have to remember it all.

9. Follow up controlled and freer practice of the language point.

10. Follow up task (E.g. Students create their own story using the language).


Advantages of using a storyboard to present language

  • Pictures give a strong visual representation of meaning; they are efficient and much clearer than wordy definitions.
  • Stories are engaging and memorable for the students.
  • The storyboard allows the teacher to go back to the beginning, repeating, recycling and reinforcing the language.
  • This kind of approach involves lots of opportunity for eliciting language and getting the learners working together.
  • The meaning of new language is clear from the context.
  • Meaning comes first when eliciting.

Perhaps you could find some other things to use this storyboard for.  Any suggestions welcome in the comments below.

Now back to that cupboard…

Posted in Mains, Starters | Tagged , , , , , , , , , , | 10 Comments

Getting Instructions Right

This is my third post in a series of posts going ‘Back to Basics‘, re-examining techniques and ideas introduced on teacher training courses.

20140720-091725-33445879.jpg

One of the first things that is often taught on a teacher training course is the importance of clear instructions when setting up activities. Classic examples are often given of bad instructions, such as those below when setting up a ‘find someone who…’ activity.

What I’d like you to do in a minute, if you could just listen to me for a second, I’d like you to look at this worksheet (T distributes worksheet) and look at the sentences like ‘find someone who likes cycling’, then stand up and ask everyone if they like cycling, then if they do, write their name and if they don’t ask someone else, then ask different people different questions and try to find someone for each sentence, all right? Ask questions and find the people… Stand up, you’ve got 5 minutes. Yes Luca, stand up and ask questions… Oh and ask other questions too.


Some tips for better instructions

1. Get full attention
There’s nothing worse than having to repeat yourself over and over again. Wait until everyone is looking at you and listening to you. Think about your position in the class, can everyone see you? Avoid giving instructions whilst writing on the board.

2. Grade your language
Slow down a little and use clear, uncomplicated language, use imperatives.

3. Cut out unnecessary language
Lose things like cleft sentences (‘What I’d like you to do now is…’), which are often just noise.

4. Stage the instructions
Is it necessary to give instructions for the entire activity? Just give the essential instructions first, then further instructions later. Do students need to know that when they have finished writing they are going to check with another student? Tell them this later.

5. Plan your instructions
Think carefully about the exact wording and write the instructions in your lesson plan. You may or may not actually use them in the lesson, but the process of planning them should help.

6. Don’t explain, demonstrate
Demonstrations and gestures are always better than wordy explanations.

7. Worksheets after instructions
If you have a worksheet, give it out at the end of the instructions, hold one against your chest to demonstrate, or display it on the board. The minute you give students a worksheet, they generally stop listening to you and start reading.

8. Use Information Checking Questions (ICQs)
Ask the students a few simple questions after you have given your instructions to check they have understood.

9. Monitor the activity straight away
As soon as the students start, check they are doing what you intended, help those who appear to have misunderstood.


Let’s see if we can improve those instructions for the ‘find someone who…’ activity again.

T writes on board:

Find someone who … likes cycling. ___________________

T – ‘What’s the question?’
Ss – ‘Do you like cycling?’
T – ‘Good, Sara, do you like cycling?
Sara – ‘No, I don’t’
T – ‘Enrico, do you like cycling?’
Enrico – ‘No, I don’t’
T – ‘Giusi, do you like cycling?’
Giusi – ‘Yes, I do’
T – ‘Oh, how often do you go cycling?’
Giusi – ‘Sometimes I go cycling at the weekend’

T writes ‘Giusi’ in space next to sentence.

T holds up worksheet to chest pointing at sentences.

T – ‘Here are ten similar sentences… for example… find someone who has visited Paris… What’s the question?’
Ss – ‘Have you ever visited Paris?
T – ‘Good… Ask the other students questions… If someone says yes, write their name and ask for more information… You have 10 minutes’.

Follow up with some ICQs:

T – ‘Do you speak to one person, or lots of people?’ Ss‘Lots of people’.
T – ‘What do you do if the person says no?’ Ss‘Ask another question’, ‘ask someone else’.
T – ‘What do you do if the person says yes?’ Ss‘Write their name and ask for more information’.
T – ‘Do you write a name or an answer?’ Ss‘A name’.
T – ‘How much time do you have?’ Ss’10 minutes’.

Posted in Sides | Tagged , , , , , , | 12 Comments

Timelines in EFL

This is my second post in a series of posts going ‘Back to Basics‘, re-examining techniques and ideas introduced on teacher training courses.

What is a timeline?
A timeline is a visual representation of the relationships that exist between tense and time. They are simple drawings which can illustrate the meaning of these sometimes, let’s face it, rather complex relationships.

Why use a timeline?timeline

  • Timelines can illustrate meaning in a much simpler way than using metalanguage to describe tenses (e.g. ‘we use this tense to talk about something that began in the past and continues up to the present’).
  • Used alongside concept checking questions, they can reinforce meaning.
  • They may appeal to more visual learners.

What can timelines be used for?
Timelines are mainly used in the EFL classroom to represent grammatical tenses.


An example

By the end of the year, Sophie will have been living in Paris for 4 years.

I’ve deliberately chosen a difficult tense to exemplify how a timeline can illustrate a complex idea much more simply. A teacher explanation might go something like ‘we use this tense to talk about something that began in the past and will continue up to a particular point of time in the future.’ – a lot of information to process there.


The nuts and bolts of timelines

  • A basic timeline is labelled with ‘past’, ‘now’, and ‘future’, as appropriate.

20140622-223114-81074147.jpg

  • Specific points in time can be added using a X.

20140622-223203-81123286.jpg
This example could visualise ‘The film started before I arrived’.

  • Arrows can be added to show connections between times.

20140622-223258-81178680.jpgThis timeline could contrast with the previous by illustrating the past perfect ‘I arrived after the film had started’.

  • Wavy lines can be added to represent actions in progress (useful for continuous tenses)20140622-233130-84690656.jpgThis could represent ‘This time tomorrow I’ll be flying to Italy’.

Tweaking your timelines

  • Adding simple pictures can make timelines even more visual.20140623-003758-2278404.jpgThis could represent ‘I used to play the saxophone’.

A simple idea, but effective.  Some other great examples can be found in ‘Basic English Usage’ by Michael Swan.

image

Posted in Mains | Tagged , , , , , , , , , , | 22 Comments

Concept Checking Revisited

This is the first (hopefully) in a series of posts going Back to Basics, re-examining techniques and ideas introduced on teacher training courses.

Concept checking questionsMany teachers are introduced to the idea of concept checking in their initial teacher training courses, try it out for a bit, and then forget about it. Sound familiar?

What is concept checking?
The British Council Teaching English website defines concept checking simply as

finding out if a learner has understood a new item.

With concrete items, this could be as simple as asking a learner to point to an object in the room. With more abstract ideas, this could be targeted questions to explore the parameters of meaning.

Why is it useful?
Concept checking can help the teacher to see beyond doubt that the student has understood. Asking the class ‘do you understand?’ is not so useful as it doesn’t demonstrate the learners’ understanding.

What can it be used for?
The most obvious use for concept checking questions is vocabulary. They can also be useful for grammatical structures and ideas.


Concept Checking Vocabulary
Let’s look at a lexical item in context:

Last Easter, we took the overnight ferry from Palermo to Naples.

Ustica Island, Sicily  © Jonathan Ingham

Ustica Island, Sicily
© Jonathan Ingham

Possible concept checking questions

  • Is a ferry small or large?  large
  • Is a ferry fast or slow?  slow
  • Is a ferry for people or industry?  people and industry
  • Can you take your car on a ferry?  yes
  • Where else can you go by ferry from Palermo?  Genova, Citavecchia, Tunisia, Ustica
  • Which boat is a ferry? (Showing flashcard)  learners point
  • Have you ever been on a ferry? Where did you go?  students’ own answers.

Concept Checking Grammar
Let’s look at a grammatical structure in context:

By December, Sophie will have been living in Paris for 3 years. (It is now June 2014).

Possible concept checking questions

  • Does Sophie live in Paris now?  Yes
  • Has she always lived in Paris?  No
  • When did she move to Paris?  2 1/2 years ago or December 2011.
  • Will she be in Paris in December?  Yes
  • So is this sentence talking about the past, the present or the future?  The past, the present and the future.

This could be followed up with a timeline:timeline


How can you write a good concept checking questions?

1. First, take a good monolingual dictionary to check the core meaning of the lexical item, or a good grammar reference book to check the meaning of the structure.

2. Write down the core meaning.

3. Turn these sentences into simple questions.

E.g.  I visited a charming old village full of quaint houses.

1. Definition
20140610-195003-71403399.jpg

2. Core meaning
It is interesting… It is attractive… It is unusual… It is old-fashioned.

3. Concept checking questions
Are the houses interesting or boring?  interesting
Are they attractive or ugly?  attractive
Are they normal or strange?  strange
Are they old-fashioned or modern?  old-fashioned


Different types of concept checking questions.

Display questions and referential questions

Display questions are those which the teacher already knows the answer to and is simply asking to check the core meaning. There is a clear right or wrong answer.
Referential questions are real questions, they are more open and the students can respond more freely and personally.

E.g. We went to a really bustling market full of life.

Display question   Are there a lot of people or very few people in a bustling area?

Referential question   Where is a bustling area in your city?

It is good to use a variety of question types, it is more logical perhaps to begin with display questions then move on to referential questions.

Display questions can be:

  • Closed questions  E.g. Is a test-tube big or small?
  • Open questions  E.g. What can you buy in a newsagent’s?
  • Trick questions  E.g. So, when you are made redundant, you did something wrong at work, right?
  • Sentence finishers   E.g. A screwdriver is used for…

Common pitfalls  

  • Checking the context rather than the concept.   E.g. ‘He didn’t know the answer to the exam question so he made something up‘.   CCQ – ‘Did he pass the exam?’ (This does not check the meaning of the phrasal verb ‘make up’).
  • Using language more difficult than the item being checked.    E.g. ‘When Bill arrived, we were having lunch’.   CCQ – ‘Had we already started lunch when Bill arrived?  (If teaching the past continuous, the students are unlikely to have much awareness of the past perfect).
  • Using the target language in the CCQ.   E.g. He hasn’t finished his homework yet.  CCQ – ‘Has he already finished?’ (Checking the present perfect with the present perfect).
  • Using CCQs unnecessarily.  E.g.  Teacher shows the class a picture of an eagle in flight and asks a CCQ – ‘Can an eagle fly?’ (Bemused look from students!)

In summary:
Good concept checking questions should:

  • Relate to a model sentence in some sort of context.
  • Be thought out carefully at the planning stage to ensure the core meaning is being checked.
  • Be easy to answer – yes/no, one-word answers.
  • Be surrounded by language which is easy to understand.

With thanks to my own teacher trainers at IH Palermo for first introducing me to CCQs and my Delta trainers at IH London for helping me revisit them myself.

Posted in Mains | Tagged , , , , , , , , , , , | 25 Comments

Back to Basics

It’s June in Sicily… Not only does that mean it’s starting to get really hot here in Palermo, but it also means I’ll soon be wearing a different hat at work… We have a CELTA course starting in a couple of weeks. It is fascinating being the other side of a CELTA course as a tutor and it really takes me back to my own CELTA course many years ago at this very school. Over the next few weeks, time permitting, I hope to blog about some of the methodology and ideas introduced on a CELTA course in a series of posts going back to basics. 20140605-225859-82739650.jpg So expect posts on lesson planning and aims; instructions and classroom management; concept checking; meaning form and pronunciation; lesson types; and whatever else emerges in the course. Watch this space…


Back to Basics blog posts

Posted in Uncategorized | Tagged , , , , , | 6 Comments

The 5-Second Rule

20140520-234852-85732310.jpgThere is a common adage that any food dropped on the floor is safe to eat if picked up within five seconds. Now I’m not sure if this is a theory I subscribe to wholeheartedly but I’d be lying if I said I had never done it. An alternative 5-second rule I do subscribe to however relates to an important interaction between teacher and students in the classroom.


Back in September 2012, at an AISLi DoS Days conference in Bologna, I was listening to Jim Scrivener and Adrian Underhill presenting their views on Demand High Teaching. This was the first time I’d heard their ideas on this and I found many of the suggestions for tweaking classroom interactions struck an immediate chord with me. Jim talked about avoiding rubber stamping when getting feedback from students, he summarises this here in a short video from IATEFL 2012 in Glasgow:

I can remember Jim’s words in Bologna as he spoke about this:

…hold for five seconds… read the room… allow for space…

…wait a little longer than is comfortable…

This was something I immediately took away with me and tried out in my classes.  I have found it has made quite a difference.  The most natural thing for a teacher to do is jump in and respond, but just letting things hang in the air a little longer can have a great effect, allowing ideas to brew, perhaps allowing other less vocal students to contribute their ideas and stronger students to question their answers.  This encourages more interaction between students, rather than a teacher->student->teacher->student interaction loop.

I also remember Jim suggesting a way to avoid jumping in, making use of ‘The Finger Lock’, as demonstrated by Obama below:

20140521-002817-1697767.jpg
Not only does this physically prevent the teacher from jumping in, but it also has the benefit of making them look very wise, like they are in deep intelligent thought, which can’t be bad!

Try it out in class!


But remember, the 5-second rule does not apply to ice-cream!

image


My thanks obviously go to Jim Scrivener for introducing me to the ‘five second rule’ and the ‘finger lock’. If you don’t already own a copy of his book ‘Classroom Management Techniques‘, I would highly recommend it for more practical tweaks to help with classroom interactions and interventions.

Posted in Sides | Tagged , , , , , , , , , , , , | 6 Comments

Come Cline with Me!

This is a follow up to a blog post I wrote a couple of months ago on using clines in language teaching,

First of all, I’d like to say a big thank you to all the readers, numbering over 35,000. An overwhelming response. It was a simple idea which seemed to strike a chord with teachers around the world. It goes to show how often the simplest of ideas can be the most effective.

As a result of the positive feedback from the post I decided to talk about this topic at the IH Teachers Online Conference on Friday 9th May. This session was recorded and the slides and recording are available on the conference blog or by clicking below.

It was a great conference and there were some super sessions from 25 teachers, trainers and managers from IH schools across the world. Each speaker had just ten minutes to present an idea so it gave some great snapshots of current practice, skills, tips and techniques.

Thank you to Neil McMahon and all the IH World team for organising such a great event, I look forward to the next one!

Why not check out the conference blog next time you have a spare ten minutes.

Posted in Manager's Office | Tagged , , , , , , , , | 1 Comment

Keralan Chicken Masala

20140504-204946.jpg
This is a recipe for a really great curry. I picked it up on a cooking course in Cochin, Kerala, in India.  I also picked up a great dal recipe, you can find this in a previous post.


Ingredients

Chicken Marinade
1 kg. chicken
1/4 tsp. turmeric powder
1 tsp. chilli powder
1/2 tsp. salt
1 tsp. vinegar

Vegetables
2 onions – finely chopped
2 green chillies – finely chopped (no seeds)
2 tomatoes – chopped.

Spices
20140504-231131.jpg

  • Black Mustard Seeds – 1 tsp.
  • Cumin Seeds – 1/4 tsp.
  • Garlic paste (or crushed) – 1 tsp.
  • Ginger paste (or crushed) – 1/2 tsp.
  • Turmeric powder – 1/2 tsp.
  • Coriander powder – 2 tsp.
  • Garam Masala powder – 2 tsp.
  • Crushed Pepper – 2 tsp.
  • Chilli powder – 1 tsp.
  • Salt – 3/4 tsp.
  • A few curry leaves (or coriander leaves).

Directions

1. Marinade the chicken for half an hour with the turmeric powder, chilli powder, salt and vinegar (see above).

2. Fry the chicken in a little vegetable oil until cooked.

3. Heat some vegetable oil in a pan and add the mustard seeds. Once they start to pop and it smells like popcorn turn the heat down and add the cumin seeds.

4. Add the onion and sauté until they start to brown.

5. Add the green chillies and continue to fry a little longer.

6. Add the garlic and ginger (together if using paste, if crushed add the garlic first). Lower the flame.

7. Add the powders onto the onion, not directly onto the hot surface of the pan. Mix it all together.

8. Add the tomatoes and coconut milk.

9. When the milk is boiling, add the chicken and half of the curry leaves. Simmer and cook on a low flame for 20 minutes.

10. Add the remaining curry leaves.


Serve with rice or Indian breads.

Posted in Recipes | Tagged , , , , | 1 Comment